OpenSCAD Tutorial & Cheat Sheet: Getting Started With a Free CAD Software
In this tutorial, you will learn how to use OpenSCAD and how to create your first model for 3D printing with this powerful, free CAD program. Four OpenSCAD tutorial videos and a cheat sheet that summarizes all important commands will make your start with OpenSCAD as easy as possible.
The Software: What is OpenSCAD?
OpenSCAD is a free CAD software that allows users to create 3D models for 3D printing. This program is available for Windows, Mac, and Linux, and can be downloaded here. OpenSCAD does not focus on creating 3D files for art projects or organic structures. It’s definitely more suited for small spare parts, machine parts, and functional 3D prints. That being said, let’s get started with the OpenSCAD tutorial!
Part 1 – Introduction to OpenSCAD, Resizing, Moving, Subtracting
In this first video, David gives us the big picture of how OpenSCAD works. Complex shapes in OpenSCAD are basically made up of a large number of simple 3D shapes, called primitives. Primitives can be cubes, spheres, cylinders, etc. Think about an OpenSCAD 3D model like a LEGO project. In order to create a stunning design, you just have to use the right LEGO bricks in the right places.
Once you create these primitives, you can move them around in a 3-dimensional space, rescale them, and rotate them. You can add primitives together or subtract them from each other (in order to create cut-outs and holes).
As David explains, “If you do this in a clever enough way, you can get complex 3D models.”
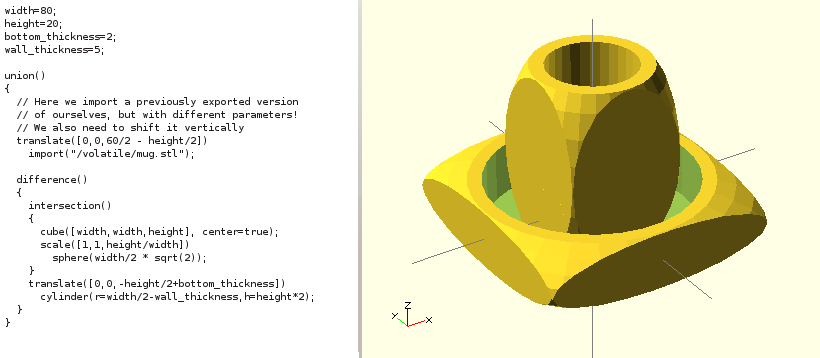
When creating a new design in OpenSCAD you will immediately see the split-screen interface. The left-hand side is the editor or console. Here you can type your commands (that’s right, in OpenSCAD you don’t draw with your cursor but by typing commands). On the right-hand side, the result of your command will be depicted as a 3D model in real-time. So if you type the command cube(3); you will see a cube with the dimensions of 3mm x 3mm x 3mm on the right-hand side.
Get started with OpenSCAD and learn the most basic commands by taking a look at the first video of David’s tutorial series.
Part 2 – Creating a Simple 3D Print
So let’s create our first simple 3D print based on the commands that we’ve learned so far. David will guide you through the process of putting simple primitives into the bigger picture and creating a simple functional 3D printable object.
For example, he will subtract the shape of a cylinder in order to create a plate with a hole. David will then show you how to rotate objects, how to resize them, and why giving a group of primitives a ‘name’ can be helpful.
Last but not least you will learn how to use variables (such as length, width, thickness) for designing objects. Variables are more flexible and can be changed in a matter of seconds. While this is not super-important for simple designs, it will make editing complicated models so much easier. We’ll talk a bit more about this in part 4.
Part 3 – Copy/Paste and Rotating
It’s time to talk about copies now. So far we’ve basically patched primitives together to create a more complex object. With copying and pasting, we can patch several complex objects together in order to create even more sophisticated designs. So, in short, we’re taking the same logic a bit further.
It’s quite straightforward. David will show you how it works in this short video:
Part 4 – Making a Basic Spare Part with OpenSCAD
Okay, now it’s time to take your first OpenSCAD knowledge to the test. David wants to create the 3D model for 3D printing a simple motor mount. He’ll guide you through the entire process and start from scratch.
In this last part of the video tutorial, David focuses on how you can use a variable to your advantage and how to set the perfect values for units.
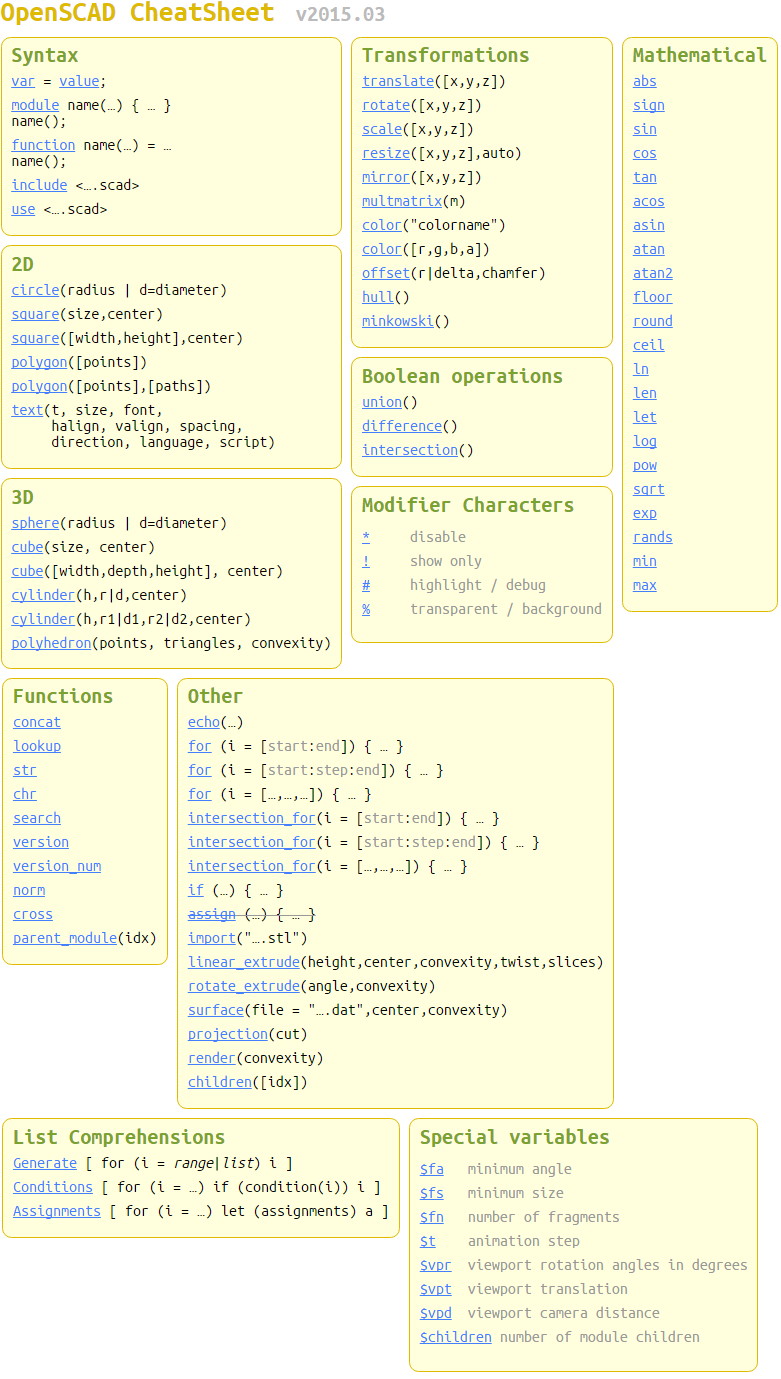
Part 5 – The OpenSCAD Cheat Sheet
The last thing you need to get started with OpenSCAD is probably a good overview of all commands. This is where OpenSCAD’s ‘cheat sheet’ comes in handy. It summarizes all the commands that you’re likely to need for creating your 3D model.
Part 6 – 3D Printing Your Design
Once your 3D model is ready, it’s about time to send it to a 3D printer. If you don’t have a printer yourself, if you want to print in many ‘exotic’ materials such as steel, gold, silver, wood, or ceramics, or if you need a high-quality print with a professional finish, you can use online 3D printing services like i.materialise.
Simply upload your model here, choose from 100+ materials and finishes and let us print your OpenSCAD 3D model for you!