
3D Printing in Photoshop
Great news for Adobe Photoshop users: you can now turn your Photoshop CC (Creative Cloud) creations into real objects through i.materialise’s high-quality online 3D printing service! Photoshop CC now supports 3D printing with many of the materials offered by i.materialise, and provides useful functions such as instant pricing and automatic mesh repair. Read more to learn how to get started!
3D Printing in Photoshop: Getting Started
To get started 3D printing on Photoshop, first download i.materialise’s 3D printer profile from the Photoshop website. Once your download is complete, unzip the folder and open Photoshop. Click File (on the top menu bar) > Scripts > Browse > .JSX file (in the i.materialise printer profile folder). You’ll see a “Done” message once the profile is successfully installed. If you don’t have Photoshop on your computer, you can sign up for a 1-month free trial here.
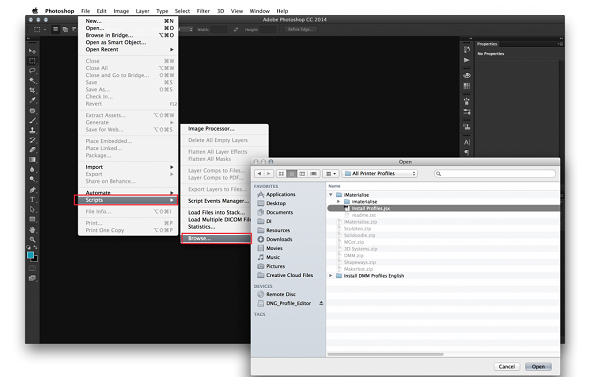
3D Printing with Photoshop: How to import a printer profile. © Richard Curtis’s Blog
Photoshop’s 3D Printing Settings
After installing the printer profile, open your 3D model in Photoshop. Click “3D” on the menu bar at the top, then choose “3D Print Settings”. You’ll see i.materialise’s name in the “Print to” destination dropdown on the right-hand side.
Under Printer options, you’ll see the list of materials that we offer for 3D Printing from Photoshop: Brass, Silver, Ceramics, Multicolor, and Prime Gray. Of course, the normal range of colors and finishes are made available for each material!
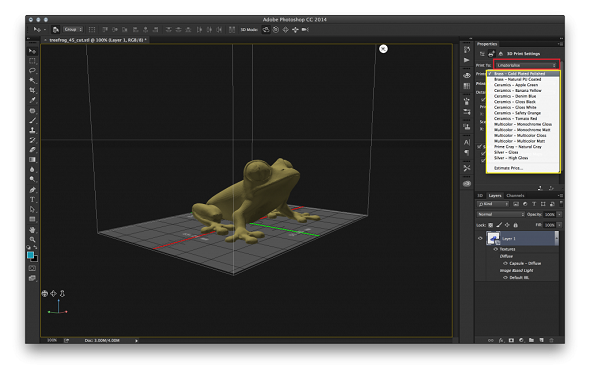
3D Printing with Photoshop: Choose your 3D printing material from the right hand side. © Richard Curtis’s Blog
Estimate the Price of your 3D Print
Just like when you’re uploading your model directly to our website (see here), you can check the cost of 3D printing on Photoshop. When you click “Estimate Price” at the end of the materials list under “Printer”, Photoshop automatically repairs the mesh of your model to make it solid and printable (this allows our algorithm to estimate the price precisely). In a few seconds, you’ll see price estimations for each material and the available finishing options.
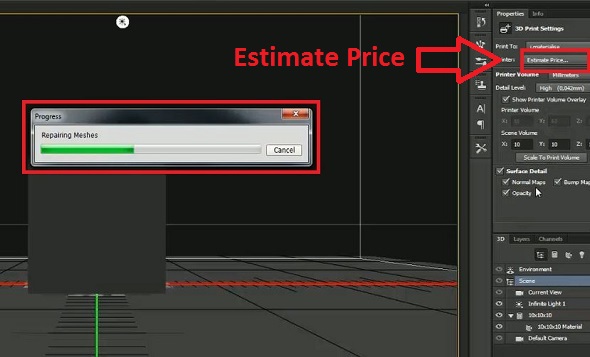
Click “estimate price” at the end of the materials list, and wait for auto mesh repair to be done
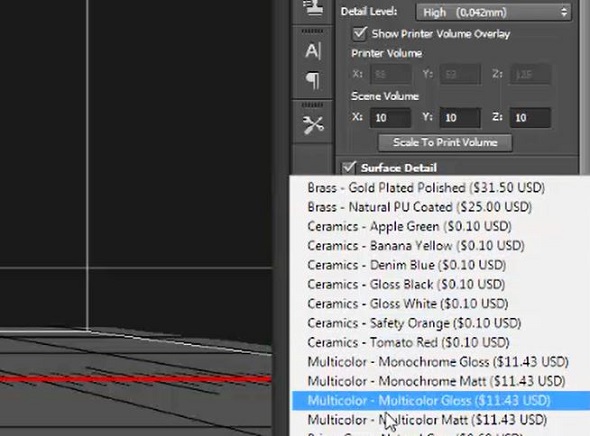
Prices are shown next to the material & finishing options
Export Your 3D Design (.stl File) for 3D Printing with Photoshop
Once you decide which material you want to 3D print your model in, click the small “Upload” mark on the menu bar located on the right side of your screen. You’ll see a preview and summary of your model and 3D printing preferences. Click “Export,” and save your file in .STL format.
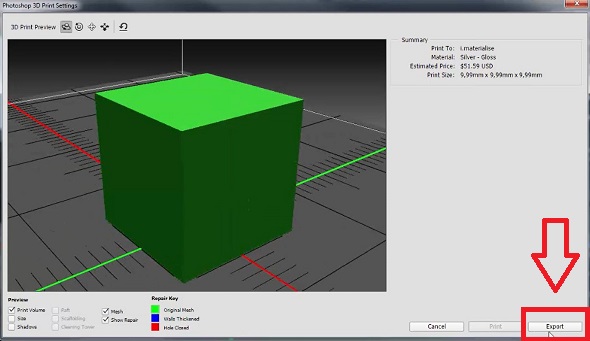
Click “Export” and save your file in .STL
3D Printing Your Photoshop Design with i.materialise
When exporting to .STL is complete, you’re nearly there! A dialogue window will show up and ask if you want to upload your model to the i.materialise website. Just click “Yes” and wait for your browser to load the 3D Print Lab page.
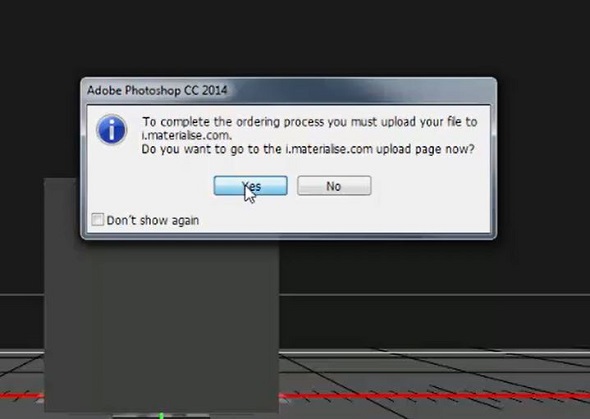
After clicking “Yes,”your browser opens
The material and finishing options you chose on Photoshop will already be reflected in the 3D Print Lab. Click the blue “Upload your 3D model” button, select the .STL file you just exported from Photoshop, then you’re set! Proceed with payment to bring your design to life.
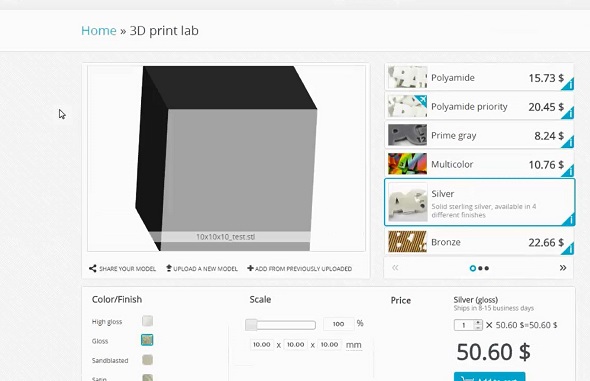
.stl.zip file uploaded on 3D print lab
Examples: 3D Prints Created with Photoshop
If you’re wondering how to apply Photoshop to your 3D printing project, these examples of 3D models designed with the help of Photoshop might inspire you!
White Rhino by Baushkin: Modeled on Zbrush and Maya, then prepped for 3D Printing using photoshop.
Holdeen’s Max by Gilberto Magno: Magno used Maya for base, Zbrush for details and Photoshop for textures.
Ready to start 3D printing with Photoshop and i.materialise? Then turn your dream into 3D printed reality! You can also upload your 3D design directly to our website and order it in highest quality in more than 100 3D printing materials, finishes, and color options.
Recommended Articles
No related posts.


