3D Printed Jewelry Design Challenge: Win a 3D Print of Your Jewelry Design
3D printing is revolutionizing the working processes of jewelry designers around the globe. To encourage even more people to start using 3D printing to their advantage, we are excited to announce a new design challenge together with RhinoGold: we invite all 3D modelers to submit their designs for rings, pendants, earrings, cufflinks, and any other piece of jewelry. All participants stand a chance to receive their submission as a printed 18K gold or sterling silver item.
3D printing gives jewelry designers immense design freedom and is changing the way goldsmiths work and design. In recent months we have featured outstanding talents, like Desmond Chan, who create stunning and innovative 3D printed pieces of jewelry. Would you like to give it a try yourself and are you up for a challenge? Then this contest is for you!
We ask you to submit 3D designs of jewelry pieces via our challenge page until midnight (Central European Summer Time) on October 11th (Sunday). The challenge is open to all designers, anywhere along the scale from professional to amateur. There is no limit on the number of entries per contestant, so feel free to upload several designs. Since the winner will be selected on the basis of the 3D renders you put online, we recommend that you send us very clear, visible renders.
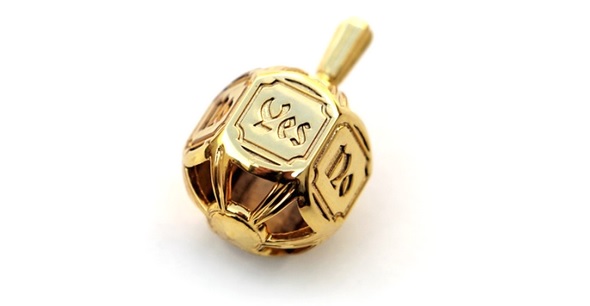
Decision Spintop by Michael Mueller
The prizes
The winner of the design challenge will receive a 3D print of their design either in sterling silver with a finish of their choice (the model can have a maximum volume of 4300 mm³) or in red, yellow, or white 18K gold (with a maximum volume of 270 mm³). Additionally, the winner will receive a 3 month subscription from RhinoGold, a goody bag from i.materialise and a free ticket to the 3D Printshow in Paris (16-17 October 2015).
The second and third places will be awarded goody bags including vouchers from i.materialise as well as a 1 month subscription from RhinoGold.
Create your winning design!
Before submitting your designs, we invite you to take a look at our material pages about gold and silver. You will find general information about the materials there, as well as practical guides on how to create your perfect 3D model. Try to keep these guidelines in mind when submitting your design. It’s also a good idea to visit the jewelry section of the i.materialise shop to get some inspiration.
The materials and finishes
When submitting a design, please specify which material and finish you had in mind. Silver models can have a maximum volume of 4300 mm³ and 18K gold models a maximum volume of 270 mm³. Let’s take a look at the finishes that are available here at i.materialise:
Our sterling silver items are made of 92.5% pure silver and come in five different finishes: gloss models are post-processed in a magnetic tumbler. This technique is the least aggressive process for silver. The polishing technique of high gloss is quite aggressive, by comparison, and will round sharp corners. Therefore, this technique will result in the lowest level of detail for silver, but provides the highest level of smoothness and shine.
Gloss silver and high gloss silver finishes.
Satin, sandblasted and antique silver.
Satin models are manually post-treated with a wire brush to obtain the effect of lines on the metal. Sandblasted models are post-treated with an abrasive blasting operation. The surfaces of your model will become even and smooth with a matte look. Antique silver features very shiny and smooth outer surfaces while deeper, recessed areas are darker and unsmoothed.
18K gold contains 75.2% pure gold. To make your jewelry more durable, silver, copper, and zinc are added. The composition of this alloy has a huge impact on the final color of your items. As a result, 18K gold can be offered in several colors: yellow, red, and white gold.

18K yellow, red, and white gold.
The technology behind it all
To create parts in gold and silver, we use Lost-Wax Printing and Casting. This technology builds upon modern 3D printing technology as well as traditional metal casting.
It all starts by 3D printing your model in wax. This step involves a type of stereolithography that uses a wax-like resin. Support structures are printed along with the model to make sure it doesn’t fall apart. These support structures are automatically generated and manually removed after the printing process.
Next, one or more wax sprues will be attached to your model. Then your model will be attached by the sprue to a wax ‘tree’, together with several other models. The tree is then placed in a flask and covered in a fine plaster. When the plaster solidifies, it forms the mold for casting the metal. The plaster mold is then put in an oven and heated for several hours to a point where the wax is completely burned out.
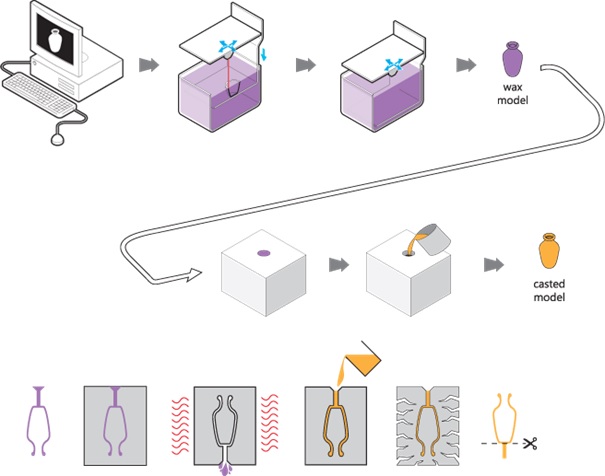
Wax 3D printing and lost wax casting are used to create a gold item.
Then, molten metal is poured in to fill the cavities left by the wax. Once the metal has cooled and solidified, the plaster mold is broken and the metal models are removed by hand. Finally, your model is filed and sanded to get rid of the sprues. It will then be sanded, polished or sandblasted to create the finish you requested. How great is that: the cutting-edge technology of 3D printing meets the ancient technique of metal casting!
Are you ready to take on the challenge?
We’re excited to see new ideas and concepts for your own 3D printed jewelry! Take on the challenge and submit your designs here. Look for some inspiration from other talented jewelry designers, and learn how to 3D model the perfect item in gold and in silver.