How 3D Printing in Steel Works
Earlier this month, we talked about how to print Aluminum and Titanium parts with Direct Metal Laser Sintering (DMLS) 3D printers. However, DMLS is not the only technology that lets you print metals. This time we will take a look at Indirect Metal Printing, a process which is used for our 3D-printed steel.
The Technology: Indirect Metal Printing
The technology behind our 3D-printed steel is known as Indirect Metal Printing. This technique builds up the model from a fine steel powder that is glued together – layer by layer, bottom to top. In this blog post we will discuss what base material is used, what the exact process of this printing process looks like, and what steps need to be taken to ensure that your steel prints get the strength you’d expect from them.
The Base Material: Steel Powder
Like most industrial 3D printing processes, Indirect Metal Printing does not include any filaments. Instead, it is based on a very fine steel powder. In this way, Indirect Metal Printing is still kind of similar to DMLS printers that use Aluminum or Titanium powder.
It is important to note that the powder used by 3D printers can’t just be any kind of powder. Since it will be used for ultra-thin printing layers, the powder must be perfectly shaped in order to retain an even surface. Consider rocks and marbles; you could easily put rocks on top of each other to build a pyramid. However, building a pyramid with marbles would be way more difficult, as the perfectly shaped spheres just wouldn’t have any traction and your pyramid wouldn’t stand a chance. Similar to the marbles, the steel powder needs to have the right shape since every printing layer needs to have exactly the same height (and we’re talking about microns here).

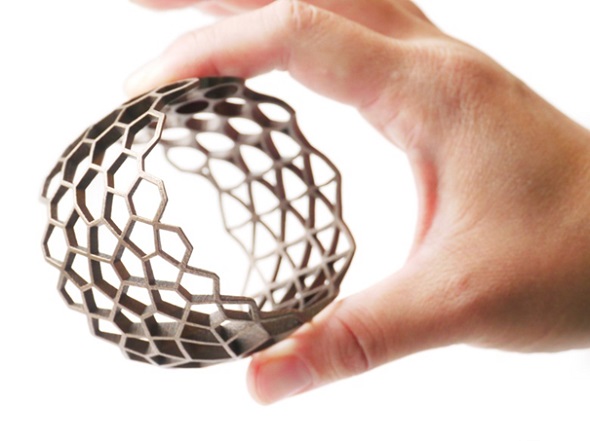
The ‘Polygons’ bracelet by Eike Schling was 3D printed in steel.
The Process of Indirect Metal Printing Explained
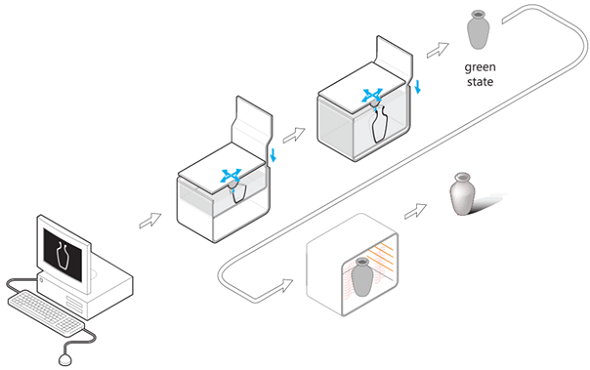
With Indirect Metal Printing in steel, your part is created by gluing together layers of steel powder.
So here’s how it works: a super-thin layer of steel powder is spread out with a roller. And then the magic happens: a printer head places tiny drops of glue on the areas of the layer that are part of your design. Once this is done, the layer is dried using powerful overhead heaters.
The 3D printer will continue to spread out one layer of powder after another, and the printer head will systematically glue the correct spots of each layer together. But… how do we turn glued steel powder into a strong and solid model?
The Strengthening Process
So far your part is in nothing more than glued steel powder – it’s not a robust metal object yet. Your model is in its so-called “green state” now. That’s why we place this fragile model into a curing oven where the powder is sintered (melted together). This is also the reason why this process is called “indirect” metal printing. “Direct” metal printing (which is used for metals like Titanium and Aluminum) already sinters the powder during the printing process with a laser beam.
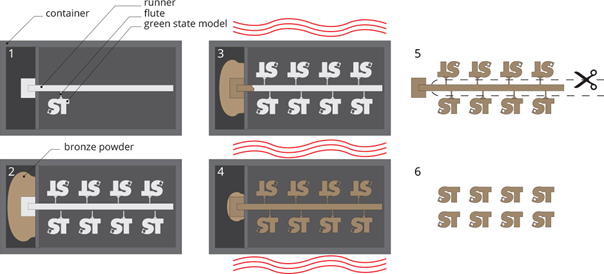
In the next step your object gets infused with bronze through connecting flutes (see graphics below). The binding agent will be burned out and replaced with bronze, which strengthens your model. After this step, your model will finally become a solid metal print that will be cut loose of the flutes, tumbled, and manually polished to offer you a smooth finish.
How to Get a High-Quality Steel 3D Print
Consumers can simply order their steel 3D prints with our online 3D printing service. This brings entirely new possibilities to designers, inventors, makers and entrepreneurs; and it also opens new doors to individualized manufacturing.
At i.materialise we’re committed to letting you make the future. If you would like to print your design in steel or one of our 100+ other materials and finishes, upload your 3D file here and see the price of your model within seconds. If you want to see some examples of high-quality steel 3D prints, take a look at our blog post “10 Stunning Steel 3D Prints”.
Recommended Articles
No related posts.


