FreeCAD Tutorial & Review: From a 2D Sketch to a 3D Print
Are you thinking about getting started with 3D modeling and 3D printing but don’t know exactly where to start? Then it probably makes sense to take a look at FreeCAD – a free yet powerful 3D design program. This hands-on tutorial by Bram de Vries will enable you to create your first 3D printing project with FreeCAD – all the way from your first sketch to the final product!
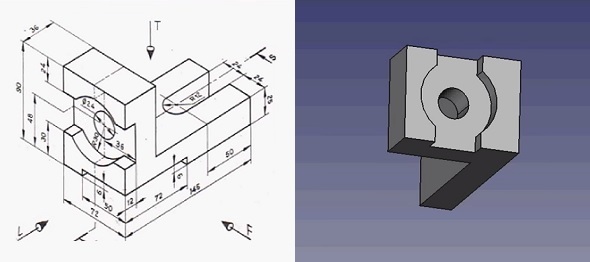
In this tutorial you will learn to create a 3D file in FreeCAD:
from a sketch (left) to the final 3D model (right).
About the 3D Modeling Software FreeCAD
FreeCAD is a popular open source design software for creating 3D models of real-life objects. Best of all it – but you already know this – it comes for free (just download it from on the FreeCAD website)! The ‘CAD’ in its name simply stands for ‘Computer-Aided Design’.
FreeCAD is a 3D design program that allows you to easily navigate and modify your 3D model by browsing back into the model history and changing its individual elements. It can be used on Windows, Mac and Linux, and reads and writes many open file formats including popular 3D printing formats such as STL, OBJ, and DAE.
This 3D modeling software is most suitable for geometric designs, such as precise technical parts, replacement parts, gadgets, cases, scale models, etc. It’s less suited for creating organic objects such as figurines of humans, animals, or plants.
Enough of the small talk – we’re here to design! Let’s get started with the FreeCAD tutorial!
FreeCAD Tutorial Part 1: Creating and Editing Primitives
FreeCAD comes with several ‘work benches’. These are basically a pre-defined set of tools that you are going to use. For example, you can create a draft by choosing the ‘Draft’ work bench. However, we will start by using the ‘Part’ work bench – because we are here for creating a real physical object!
In the video below, your instructor Bram will first show you the very basics: how to choose the ‘Part workbench’, how to start your first project, how to navigate (press Alt + left mouse button), how to add basic primitives (a box, a cylinder, etc.), and how to change the size, radius, and position of these primitives (under the menu ‘Property’).
FreeCAD Tutorial Part 2: Subtracting and Combining Primitives
In this second video, Bram will teach you some more tricks on how to use primitives. For example, you can rotate them by changing their angle.
You’ll also learn how to subtract different primitives from each other with the ‘cutout’ tool. For example: if you place a cylinder within a box and subtract them, the box will have a cylinder-shaped hole. However, the cylinder can still be edited. Changing the height and radius of it will now affect the height and radius of the hole.
You will also learn the opposite of subtracting two primitives: combining them. You can do this by selecting both elements and clicking on the ‘Make a union of several shapes’ button.
FreeCAD Tutorial Part 3: Creating A 2D Sketch
For creating more complicated designs, Bram prefers to create two-dimensional sketches first. He switches the work bench to ‘Part Design’ and shows you how to set the best sketch orientation (‘XY-Plane’).
FreeCAD lets you draw lines freehand with the ‘polyline’ tool. If you draw straight lines, FreeCAD will notice this and will ‘constrain’ them immediately for your convenience – which means that the line will be perfectly parallel with the horizontal or vertical axis. You can also add or delete these constraints manually.
Furthermore, you need to precisely define the length of each line by selecting it and choosing the ‘Make a dimension’ tool. Once all dimensions are set, FreeCAD will tell you that your sketch is ‘fully constrained’. Sounds complicated? The video below will show you that it’s quite easy!
FreeCAD Tutorial Part 4: From 2D Sketch to 3D Model
Your 2D sketch is ready – it’s about time to turn it into a 3D model! First of all, click the ‘Close the editing of the sketch’ button, then head over to ‘Tasks’ and select ‘Pad’. Choosing the ‘pad’ means that FreeCAD automatically turns your sketch into the third dimension (side remark: choosing ‘pocket’ subtracts a three-dimensional shape).
Once you see this 3D object, Bram will show you how to add additional features to it. You can click on any face (surface) of your three-dimensional object and click on ‘create a sketch’. Wait… what?! Yep, that’s going to happen a lot: in FreeCAD you often jump back and forth between sketches and 3D models.
You create a 3D model based on a sketch. Then click on one face (surface) of the 3D model and continue with the next sketch. After that, you turn this sketch in a new 3D shape, etc. This way of working enables you to add (from ‘sketch’ to ‘pad’) or subtract (from ‘sketch’ to ‘pocket’) new features and create more complicated shapes.
The best thing about this: you can always go back. Each and every sketch, pad, and pocket can be re-edited any time.
FreeCAD Tutorial Part 5: Advanced 2D Sketching
In this part of the FreeCAD video tutorial you will learn how to use some advanced tips and tricks to work with 2D sketches. Bram will show you how to logically split up and think about your model and how to use shortcuts to reach the desired results.
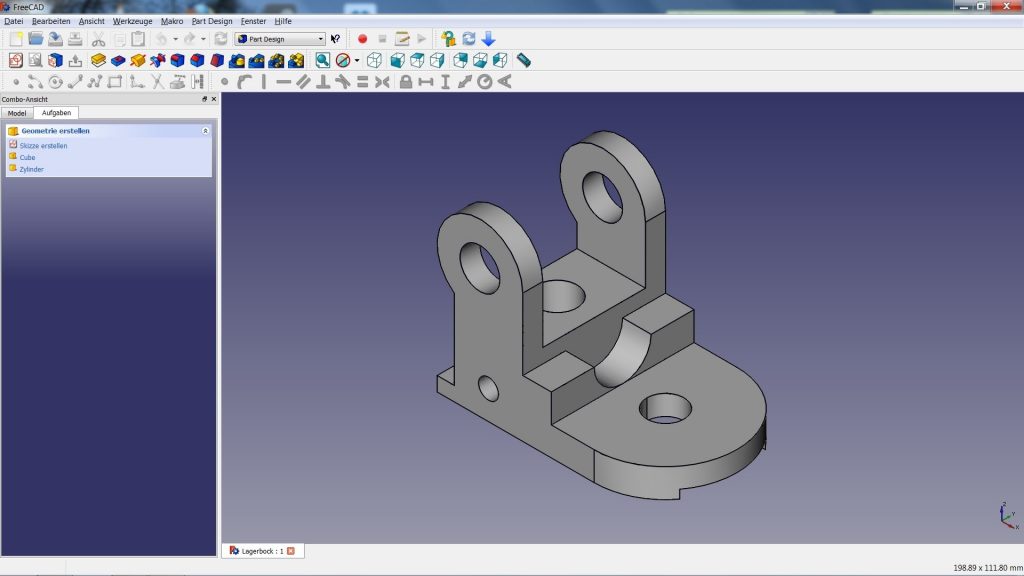
FreeCAD Tutorial Part 6: Analyzing a Finished 3D Model
Now we come to one of the most powerful parts of the tutorial. We’ll be looking at a 3D model of an audio knob that Bram created. He’ll go over his design step by step and show you exactly how he created it. This will give you a good understanding of all the working processes needed for creating a design in FreeCAD.
FreeCAD Tutorial Part 7: Hands-on Exercise
It’s time to get our hands dirty! Bram’s downloaded a sketch of a real spare part and wants to create it from sketch. He will go through the design process step by step and repeat everything you learnt in the previous videos. If you can create this file you have successfully mastered this tutorial and are good to go for your own creations now.
FreeCAD Tutorial Part 8: 3D Printing
Now the last thing to do is the most fun part: 3D printing your design! Save your design (best to save it as an STL file), hop over to i.materialise’s 3D printing service, and upload your file. You will instantly see how much your model costs in 19 different materials and 100+ different finishes.
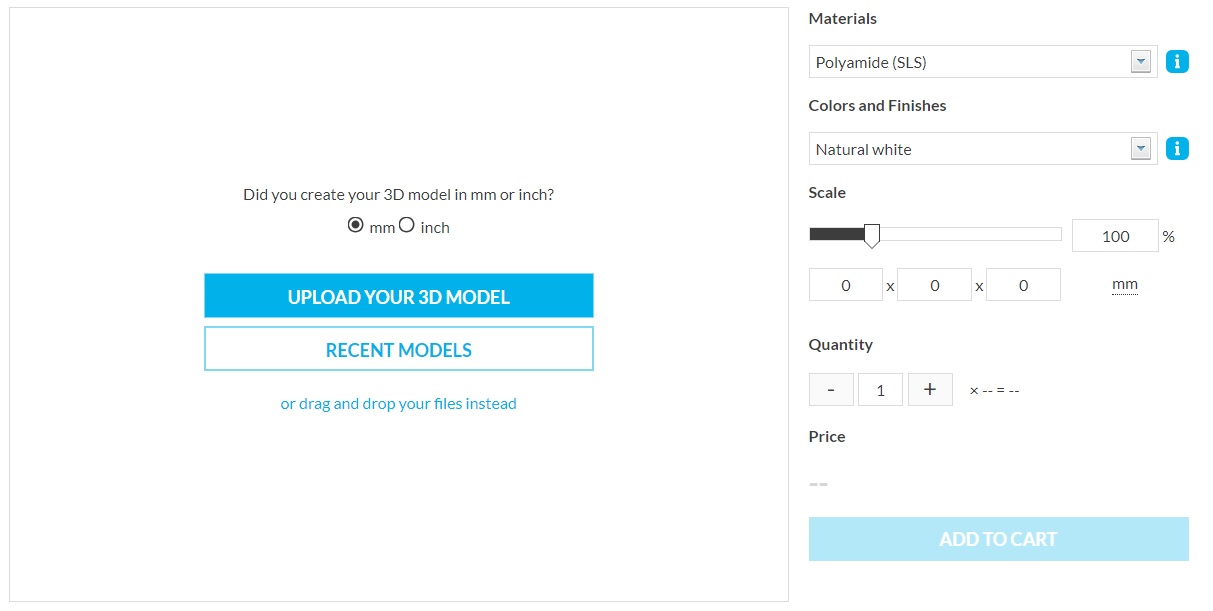
Upload your model to the i.materialise online platform for an instant price quote
If you liked this tutorial you might be interested in learning to use SketchUp as well. Click here for our beginner-friendly SketchUp tutorial. Also make sure to avoid these 5 common mistakes when modeling for 3D printing.