Tutorial Summer: How to choose your 3D printing material
In the previous episode of our tutorial summer series, we‘ve shown you maximal sizes each material can be printed in. But there is more than size to bring an idea into reality. Bert, your host, will guide you through your production process with his beautifully created Prezi.Bert: “Choosing the right material isn’t easy. I’m confronted with it every day. But to make life a little easier for you guys, I’m happy to share a ready-to-use overview.”
 1. IDEA
Open the Prezi below. Everything starts with an idea and expectations on how something will look and feel like. Usually it’s a vague idea that’s in your mind and you don’t necessarily have sketched it or drawn anything in 3D. Before you start thinking more in detail of your design idea, try to list down some expectations. This list will prove to be very useful in the next step.
 2. MATERIAL (RE)SEARCH
There are a lot of criteria to determine the best suited material for your design. Most common are size, level of detail, kind of material, use, color and finish. If you click on the right arrow in the Prezi you can see the tools we offer on our website to help you make the right choice: the printing size diagram, to get a quick impression on the different sizes of the different materials, and the comparison page, where you can compare detail sizes, minimum wall thickness, production time and so on..
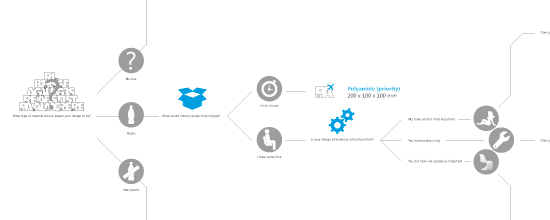
3. DIAGRAM
Next to that I follow a kind of flow diagram(prezi) in my mind. I try to narrow down the list of materials by asking some questions. By following the flow, you’ll eventually end up with one material. It’s far from perfect but works for me and I hope it can somehow help you picking a suitable material for your design ideas.
With these tools, I hope you were able to pick a material or at least narrow down the list of material to about 3. If that’s the case, you can move on to the next step: the designing process! So watch out for the next tutorial tomorrow!