Oxidized Brass & Steel Tarnish: How to Get an Antique Look
Wondering how to achieve an amazing antique look on your steel & metal objects? We talked to jewelry designer Michael Mueller about how to get the perfect oxidized brass look and steel tarnish style.
At i.materialise we love the antique look. Since we 3D print objects for our customers in more than 100 different materials, finishes, and color options, it’s only logical that we would like to share some knowledge about how to get an amazing antique, tarnish style. We currently have a few materials that can give your designs that special finish.
The Perfect Materials: Brass & Steel
One of them is steel, which gives your designs an older and somewhat rougher look if you go for the Brown Polish, Black Polish, and Natural Polish finish.


Freemason belt buckle by Universe Becoming, 3D printed in steel medieval pewter.
Another great material is brass. Gold plated brass is a great material to use if you like shiny surfaces, but to give your designs an older look, untreated brass may be a better option for you.
The brass material is really great. The gold plated finish has a goldish look and if you are up to a less sparkling solution, ‘natural brass PU coated’ is a fantastic choice!
– Michael Mueller

Gold plated versus natural PU coated brass, design by Whystler.
Getting More Contrast: Oxidation Can Be Positive
In my opinion, oxidation is a good thing! Engraved areas become darker which gives it more details and contrast.
– Michael Mueller

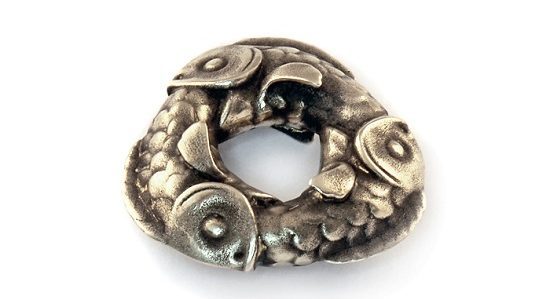
‘Greedy Fish’ by Michael Mueller after removing the coating.
How to Make Bronze and Steel Look Old
Usually, oxidation takes a month. To make this process faster, Michael recommends to do the following:
I tried different methods to age it faster. There are chemicals like ‘liver of sulfur’ which are used by goldsmiths to create a patina. You get great results but these chemicals are toxic and, in some countries, not easy to purchase. There are other ways to get the oxidation going. I like the following way best because it’s really easy and gives great results: it uses heat and oil. Follow these steps:
- Turn on a hotplate of your stove and place your item there
- After it gets hot, carefully use tweezers to grab it and throw it in a small glass filled with olive oil. I guess every sort of oil will do the job.
- That’s it! Your item will oxidize the moment it touches the oil. You can repeat this procedure until you are happy with the intensity of the patina.
After that, you can polish your design. This way it looks more natural and it will increase the contrast and the details. Natural patina looks green sometimes. By using oil, the oxidation is more black which may not look exactly like a patina which comes in ages.

Above you can see the PU coated version, below without the coating. Design ‘Spintop’ by Michael Mueller.
Bonus: Antique Silver
Last but not least I’d like to take a moment to talk about antique silver. While shiny on the outside, recessed areas of this amazing finish are dark and un-smoothed. This look is achieved because your model will undergo an oxidation process. A sulfur mixture causes the silver to become duller and darker. The surface is then polished – and gets this shiny and smooth silver look. The cool thing about this is we do all the post-processing; you only need to upload your 3D file and choose thing material finish.
If you want to receive your object in steel, brass, silver, or any other material, we can print it for you. All we need is your design as a 3D file. If you know how to create such a file, just upload it here and see the price for your 3D print instantly.