SculptGL For Beginners: Powerful 3D Sculpting Without Software Downloads, Logins, or Headaches
SculptGL is a free 3D sculpting CAD (Computer Assisted Design) program created by Stephane Ginier, a University of Montréal exchange student. It lets users sculpt 3D designs, apply symmetry, import/export these files in 3D printable formats, and automatically share them on portfolio sites like Sketchfab.
It is free, browser-based (no software downloads!), does not make users create accounts, and can be used on devices that have limited internal storage space or memory (i.e. Chromebook.) Win! This is a good software to learn 3D sculpting on, but it does not include hollowing or hole-making (i.e. Boolean) features.
To make files printable, you may need a second software (like Blender) to hollow your files, add escape holes, and repair broken topology. You can also hire a designer to clean a file up for you. Read on for our definitive SculptGL 3D printing tutorial, lovingly assembled by your Community Manager.
Basic Facts
Link: http://stephaneginier.com/sculptgl/
Price: Free
You Will Need: A mouse with a click-wheel helps, but is not needed. The keyboard commands are simple and complete enough to work by themselves.
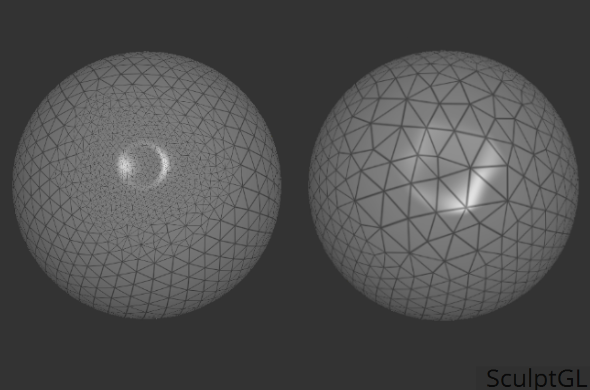
Brush tools can be used to “decimate” your mesh, which reduces the amount of triangles, squares, or other polygons on your design. Lowering the amount of vertices can save you money on your 3D print.
SculptGL is Good For:
- Sculpting: Sculpting interface is intuitive and responsive. It has special settings for Wacom tablets.
- Symmetry/Asymmetry: Symmetry can be turned on/off as you go without automatically making your entire design symmetrical. Symmetry only affects the actions you do after turning it on. Turn it off when you want to make asymmetrical details. Example: You can sculpt an asymmetrical face, turn on symmetry, and give it symmetrical cheek bones.
- Exporting and importing 3D files (supported formats include .OBJ, .STL, and .PLY)
- Painting 3D files: Symmetry features can be used in paint mode, so you can paint with symmetry (good for eyes!) Unfortunately, you can’t export your paint job yet.
- Manipulating vertices: Your design is made up of a quilt of flat shapes, usually squares or triangles. The points at the corners of these shapes are called “vertices.” You can see vertices as you sculpt, and use the brush tools to add more vertices, or to remove vertices without signifigantly affecting your design’s surface. The tool is not very sophisticated, but is good for simplifying (i.e. to “decimate”) your mesh as you sculpt… which can save you money on your 3D print.
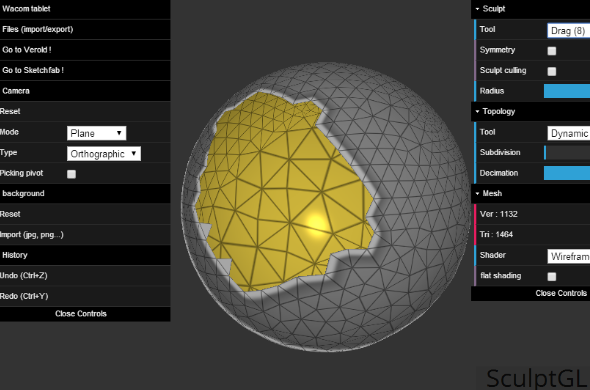
Sculpt GL does not hollow out your mesh, and its hole feature is still in beta mode (it doesn’t work yet.)
SculptGL is Bad At:
- Making Holes: Almost all files need an “escape hole” so that they can be printed and cleaned. It looks as though SculptGL is working to add a “Cut” feature, but the feature does not work in this version.
- Making Hollow models: Making a model hollow is not an option. But you can export your file, and make it hollow it another software (i.e. Blender.)
- Exact measurements. The interface is designed for sculpting, not building or programming. If you prefer building and measuring, consider “building” software like SketchUp (free), OpenSCAD (free) or Solidworks (not free.) Blender is good at both, but its interface isn’t as easy to use.
- Creating mechanical, fitted, or interlocking parts (i.e. lids, hinge joints, ball joints, wheels.)
- Fine detail sculpting (i.e. high poly sculpting). The brushes have settings for radius/size, and intensity, but no options to change how the brush behaves (i.e. pointy strokes), or the texture of the brush itself (so you can’t “smooth” with a “sponge” brush.
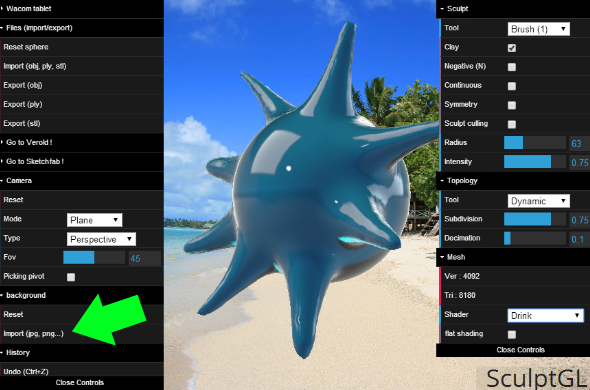
Upload your own backdrop into Sculpt GL by clicking on Background => Import. How do you like my spiky waterdrop?
Cool Features:
- Mesh Shaders (bottom left menu): This rendering option does not affect your sculpt, but changes how it looks as you sculpt it. Make your design look like it’s transparent, made of clay, or water!
- Upload backgrounds: To trace a model or put it in a more interesting environment, upload a custom background image via the “Background” menu at the middle-left side of the screen. Click “Import (jpg, png).”
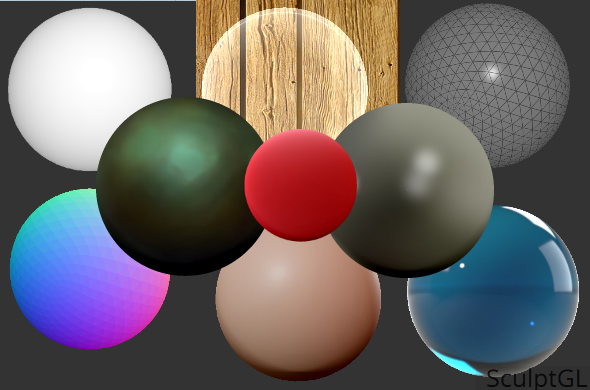
Changing your model’s “shader” changes how it looks as you sculpt it… without changing your model. Play with it!
Keyboard Shortcuts
Sculpting Tools: Each number from 0 to 9 represents a sculpting tool: scale (0), Brush (1), Inflate (2), Rotate (3), Smooth (4), Flatten (5), Pinch (6), Crease(7), Drag (8), Paint (9), Scale (10).
Undo: Ctrl+Z on Windows; Cmd + Z on Mac
Redo: Ctrl+Y on Windows; Cmd Shift Z on Mac
All Arrow Key Commands: zqsd OR wasd
Zoom In/Out: Click and hold down “Z” or “W” to zoom in and “S” to zoom out. Or, gently scroll up and down with the click-wheel in the middle of your mouse. Or, you can slide up and down the “FOV” slider at the left side of the screen.
Slide Left/Right: Click and hold down “A” or “Q” for left and “D” for right.
Pan Around Object: Move your mouse arrow to the gray area of the screen. Click down on the left mouse button. Hold your finger down on the button as you move your mouse back, forth, left, right, and so on.
View Top of Model: F
View Left Side: L
View Front Side: F
Opposite Action (i.e. make brush deflate instead of inflate): Click “N.” Click “N” again to turn off.
Hide Menu: Click “H” to hide. Click “H” again to see menu.
See All Vertices: Your design is a quilt, and vertices are the points at the polygon-shaped edges that make up the quilt. SculptGL hides vertices by default, but vertices can be revealed by selecting the “WIREFRAME” shader in the bottom right dropdown menu.
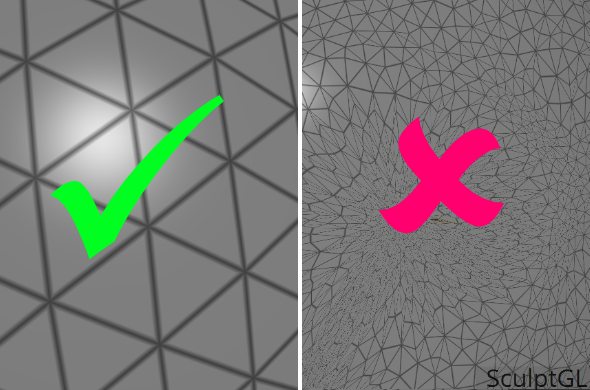
Try not to add unnecessary vertices (i.e. “squares” or “triangles”) to your model. Extra vertices can increase printing costs. Vertices should be broad and large, not long, thin, or diamond-like.
Make a Basic 3D Printable Object
Most files you create on SculptGL cannot be 3D printed without additional processing. This is because you cannot hollow out a file, or add an “escape hole.” Experts even take it a step farther, and put their sculpt files through a process called retopology.
To make a file that could print, we recommend creating a relatively flat design with only a few large, “chubby” vertices. Exporting and printing those has a high chance of succeeding.
For more complex designs, we recommend exporting your file into a software that can hollow it out and add an escape hole. We recommend Blender. As always, be sure to “proof” your model. More on that here.
Sculpted anything cool on SculptGL? Share it in the comments below!
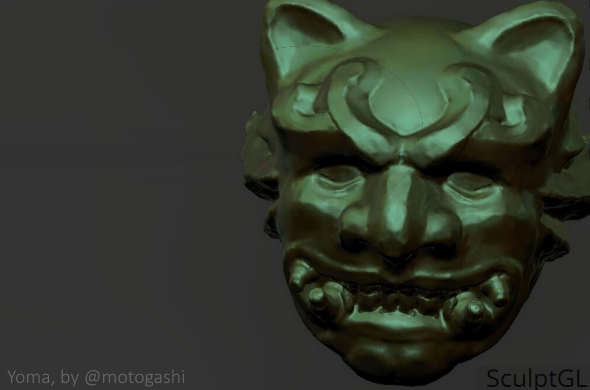
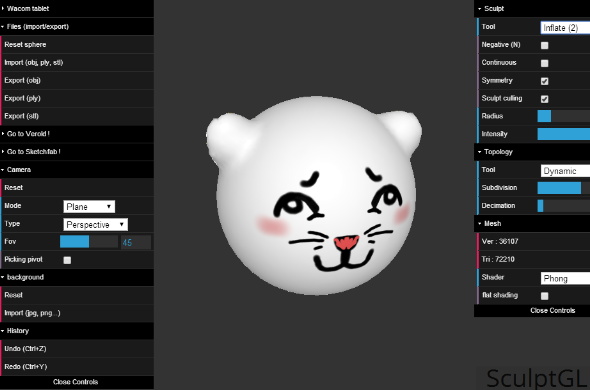
Japanese artist Motogashi designed this using Sculpt GL. For more images, check out the SculptGL user gallery.
Recommended Articles
No related posts.


