by Konstantin Gregg-Saad / Atelier Audio

Description
For use with the TAKET Batpure super tweeter set.
Each stand has 3 parts..a Front Baffle, a Back part which inserts into the rear or the Front baffle, and a third independent part which acts a rear leg.
You will also need :
- Two 3/4" x 3/4" x 5" or 6" wood pen blanks --- either BOCOTE, COCOBOLO, or ZIRICOTE wood...my favorite is BOCOTE for sound (Ebay)
- 26 or 28 gauge connection wire (Jupiter Brand / cotton / copper) from Partsconnexion / Canada. The length of each of the 4 wires will depend on how far your mains speaker binding posts will be from this stand. The stand will sit on the flat top surface of the mains speaker.
- 3M Green double-sided mounting tape.
- Finally, you will need 4 x M3 Nuts and 4 x M3 Nylon or Stainless 8mm long screws.
Assembly :
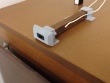
The first part is the Front Baffle = Part 1. !!! - It has two slots on its inside into which you must insert two M3 nuts using a small flat head screwdriver to gently wedge the nuts into these slots - !!!
The second part (Part 2) fits from the rear into the back of this front baffle part = Part 2.
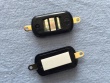
Now, you first solder the 4 lengths of cotton/copper 28 gauge wire onto their respective tabs on the super tweeters . Make sure you have your wire lengths right when you order wire. Important : Solder these onto the TAKETs tabs respecting + and - respectively as marked on the TAKET's body.
The 4 lengths of wire (2 per super tweeter) need to be long enough to reach your mains speaker binding posts to which they are ultimately connected. Mark Positive and Negative wires with red and black heat shrink or ink (preferably paint or ink).
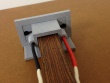
Next, slip the wires trough the provided small holes in Part 2 ... and then use two small pieces of 3M tape to stick the super tweeters on to the slot provided for this purpose on Part 2 . DO NOT slip these into the holes provided for the screws which are next to the holes for the wire. The Screw holes are the ones closer to the left and right outer edges of PART 2.
Now fit Part 1 and Part 2 together, and insert the screws into the back of Part 2 and use a screwdriver to connect the two parts. Do not over-tighten the screws please.
Next, attach a 3/4" x 3/4" piece of 3M tape to both ends of the wood pen blanks and insert one end of the wood pen blank into the hole provided for this purpose on Part 2. Then insert the other end of the pen blank into Part 3.
Now, insert the wires through the holes provided on part 3, and then connect these to your speaker's binding posts.
That is it ! Enjoy
Atelier 13 Audio
Share or Embed

Konstantin Gregg-Saad / Atelier Audio
We are a high end audio dealership based in Nashville offering very excellent finished components marketed by some of the world's best Audio manufacturers. These products are marketed via our dealer web-site at www.atelier13-usa.com. But like many audiophiles we still very much enjoy building our own electronics. DIY is however a time consuming hobby, and this is why we have begun to design and offer 3D print DIY parts in various materials that essentially make life a bit easier for the hobbyist.... parts such as capacitor brackets, point-to-point wire guides, rectifier diode bridge-mounts, tube socket mounts, connector plates, and speaker cables termination pants. When feasible, we also offer custom solutions for difficult to find parts for turntables such as finger lifts and tone arm rests.